How To Install WordPress on Google Cloud (Ubuntu or Debian) with EasyEngine?
Being a website owner, you can never rely on a single server to host your site. Frequent downtime, longer load times, and higher costs are the problems you normally face when you work with a single hosting provider. Cloud computing enables you to host your site across multiple servers, saving you money and ensuring best uptime.
Cloud computing enables you to upload your site’s files (like images, style sheets, and other assets) to a remote server, and access them on demand. To access them, a Content Delivery Network (CDN) connects to the cloud, and serves files to users across a wide network of fast servers all over the globe, ensuring quick download times and connection.
In this article, we will explain that how to install WordPress on Google Cloud (Ubuntu or Debian) with EasyEngine?
What is EasyEngine?
EasyEngine basically is a UNIX script for Ubuntu / Debian. It helps you to install a full-featured NGINX and PHP-FPM web server for WordPress. Means, it will optimize itself for NGINX to work with the best WordPress. If you are used to of Apache, it may be difficult for you to switch to NGINX, so this script would turn out to be a blessing for you.
There are some things you must keep in mind, when you are using EasyEngine.
1. .htaccess is not used with nginx web server.
2. EasyEngine is a script, not a control panel.
3. You should have Linux Server running Ubuntu 12/14 , Debian 7 or higher.
4. 1 GB RAM is mandatory.
Installing WordPress on Google Cloud Using EasyEngine
This is one of the most easy ways of WordPress installation. EasyEngine is a script wrapper which takes care of installing required components like a database, Nginx, PHP , WordPress, etc.Installing them manually, might take longer and make room for human errors.
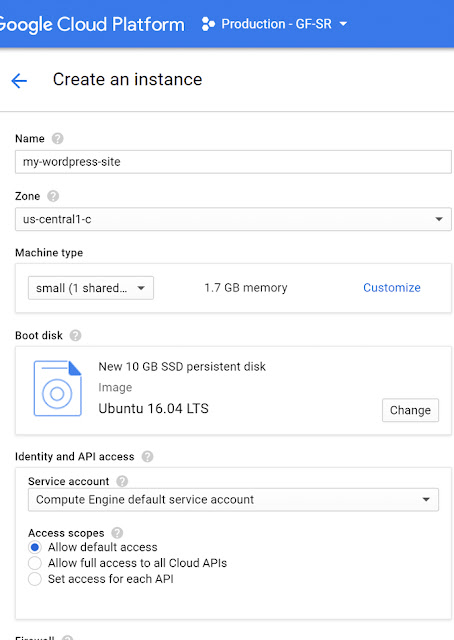
1. First of all, you have to make VM instance on Google cloud. Just login to google cloud and go to Compute Engine and then VM instances. Then click on create instance.
2. You have to fill the desired information in the dialog box. Select the zone and machine type. Change the boot disk to Ubuntu 16.04 LTS and boot disk type to SSD persistent disk of 10GB size.
3. Allow HTTP and HTTPS firewall and click create to get instance ready.
4. Now login to your newly created Google Cloud VM with Shell Access or Putty and switch to root user (sudo -su).
5. Now use the below command to install easy engine.
wget -qO ee rt.cx/ee && sudo bash ee
6. It will take couple of minutes and after that you will be returned to the prompt.
Now is the time to create wordpress site. If you want, you can install WordPress with cache plugins. It currently supports WP Super, W3 Total, Nginx, Redis. Redis is the one recommended by most users.
7. Create a site with Redis cache along with free letsencrypt ssl certificate.
ee site create mtwebsol.com --wpredis --letsencrypt
Instead of mtwebsol.com, you have to enter your domain name.
8. To get an experimental information configuration, type ,y and press Enter.
root@my-wordpress-site:~# ee site create mtwebsol.com --wpredis
Redis is experimental feature and it may not work with all CSS/JS/Cache of your site.
You can disable it by changing cache later.
Do you wish to enable Redis now for mtwebsol.com?
Type "y" to continue [n]:y
9. It will take a couple of seconds, and you will be returned to the prompt with WordPress login credential. Your username will be set as the name you had specified during installation of easyengine and same email address will be used as admin of WordPress which you had specified during EasyEngine Installation.
WordPress admin user : webstuff
WordPress admin user password : ad^&762AADhj)_!672
Configure redis-cache: https://www.mtwebsol.com/wp-admin/options-general.php?page=redis-cache
Object Cache: Enable
Successfully created site https://www.mtwebsol.com
root@my-wordpress-site:~#
10. Save the username and password in secure place.
Congratulations, you have successfully installed WordPress with EasyEngine script on your Google Cloud Server. Now is the time to point your domain to server IP.
How To Get Static IP ?
Google cloud, by default assigns ephemeral IP to the instance, which you do not want to configure with the domain as it might change in next instance reboot.
So we will reserve static IP, to avoid any risk.
1. Go to VPC network and than to External IP addresses from left navigation.
2. Drop-down the ephemeral type and than select static
3. Give the name of your choice and click reserve.
4. You will notice that type is changed to static.
GCP VM is now ready with static external IP and WordPress. Now the only task undone is to map domain to static IP.
To Update Domain A Record
Go to domain registrar and update the A record for your domain to the external IP you just reserved. It will most probably take some time to get propagated globally. Use DNS record lookup tool to verify. After updating domain A record, you can access WordPress site with the domain you used with EasyEngine command. In this example, it is https://www.mtwebsol.com.
If you are looking to install WordPress website on a VPS or Cloud, you must get in touch with us. We do offer professional website development and wordpress installation services at very economical price.


